Our Blog
Witch Craft Downloadables!
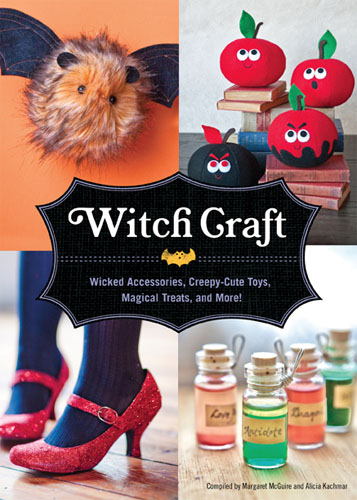
Welcome!
You've stumbled upon the Witch Craft Downloadables page! Below, you'll find some of the fun extras we promised you in Witch Craft, including the adorable Jack O' Lantern treat bag and Sarah Goldschadt's cupcake toppers!
Enjoy!
Posted by Eric Smith
Microcrafts @ Pins & Needles in New York City: Some Photos!
This past Saturday, Microcrafts co-authors Alicia Kachmar and Katie Hatz rocked the Megabus to New York City for a special Microcrafts event at Pins & Needles. They met crafting fans, and spent some time Microcrafting in the cozy NYC boutique.
Lauren Davis (of Pins & Needles), Sarah Goldschadt (she makes those delightful owlies) and Alicia took a bunch of photos at the event, and were kind enough to share them with me. Have a look at them on our Flickr page, or just scope them out in the gallery below. Enjoy!
Created with Admarket's flickrSLiDR.
Posted by Eric Smith
Get Ready to Party Microcrafts Style: Events In Pittsburgh & New York City!
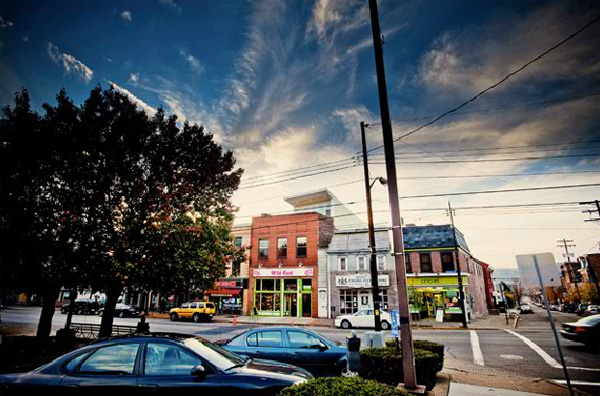
Outside Wildcard in PIttsburgh, PA
Oh those crazy Microcrafters. They make the smallest of crafts, but throw the biggest of parties. This week, there are Microcrafts celebrations going down in New York City and Pittsburgh.
The first celebration of tiny crafts takes place this Thursday, October 20th, at Wildcard in Pittsburgh, PA. Alicia Kachmar isn't the only Microcrafter from the Pittsburgh area. Local artists Nadia Marks Wojcik and Tamara Barker are also featured in the book, and will be attending the release party. The folks at Wildcard are also going to be showing off Alicia's first Quirk title, Witch Craft.
Over the course of the party (which also doubles as Wildcard's Second Anniversary bash), Tamara and Co. will be selling tickets for their Steeltown Etsy raffle to help Alicia with some recent medical bills.
The first 25 families to show up will score a goodie bag, so get there on time! For more information, visit Wildcard's official website, or scope out the Facebook event page for the party.
Wildcard 2nd Anniversary Spectacular: In 3D
Thursday, October 20th, 2011
Wildcard
4209 Butler Street, Pittsburgh PA 15201
(412) 224-2651
www.wildcardpgh.com

Inside Pins & Needles in NYC.
The second mini craft party goes down at Pins & Needles in New York City, this Saturday, October 22nd. Co-authors Alicia Kachmar and Katie Hatz will be in attendance, as well as contributor Sarah Goldschadt, helping folks with their crafts. You can look forward to making Sarah's fabulous owls and bows, as well as super cute bunting.
Everything kicks off at 3pm and runs til 5. Come hungry, because there will be some micro drinks and snacks! For more information on the party, visit Pins & Needles' official website.
Microcrafts Party @ Pins & Needles
Saturday, October 22nd, 2011
Pins & Needles
1045 Lexington Avenue 74th & 75th, 2nd Fl.
New York, NY 10021
www.pinsandneedlesnyc.com
Posted by Eric Smith
Microcrafts Microspotlight: Mei Pak, Tiny Hands Making Tiny Cupcakes
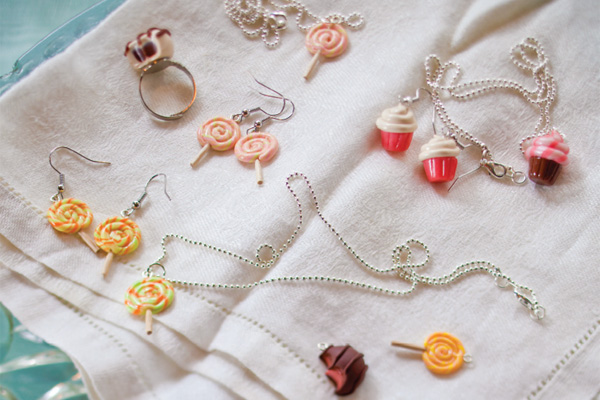
“Specializing in sweets and snacks, Mei Park has been crafting customizable food jewelry since 2006.” So reads Mei Pak's bio in the back of Microcrafts, which features tutorials on how to make her famous mini cupcakes, tiny lollipops, and itty-bitty chocolates, each of which are made using multicolored polymer clay.
If you swing by her store, Tiny Hands Online, you can browse through a number of her bestselling charms, rings, earrings and necklaces, many of which actually smell like the food they are inspired by. That maple syrup drizzled waffle necklace, pumpkin pie ring, and donut charm bracelet actually smell just as good as they look.
So go check out her website. Not only can browse by the kind of jewelry, but you can browse by the flavor. IE: Chocolate, strawberry, vanilla… even low sugar. Sweet.
Tiny Hands Online
www.tinyhandsonline.com
PS: Oh, and scope out this fabulous video of Mei via RAW: Natural Born Artists. I've pasted it after the break.
Posted by Eric Smith
Collageorama: Vintage Dictionary Page Prints for Dandy Cats Everywhere
There’s a reason that Collageorama’s Etsy shop proudly proclaims that it’s the “exclusive home of Dandy Cat and Friends!” Because seriously, look at that cat. Top hat, mustache, monocle… that is one awesome kitten to be proud of.
Collageorama’s shop dishes out exquisite prints of properly dressed animals, illustrated on repurposed dictionary pages. Here at Quirk, we love cute animals (Cuteoverload links are exchanged via email on a regular basis) and anything that has to do with books. And this shop has owls, frogs, giraffes, deer, mice, rabbits… all kinds of critters, all fantastically dressed and drawn out on recycled book pages?
Sold.
Posted by Eric Smith
Send Us Your Cat Hair for a Top Secret Crafting with Cat Hair Project!
Yes, you read that subject right.
Back in March, Margaret McGuire and Katie Hatz asked the Internet’s cat lovers to send them their cat hair for their Crafting with Cat Hair in-house projects. The entire Quirk office was shocked by the amount of fur that rolled in. We even featured three adorable donors, Buster, Shadow and Fuzz, here on the Quirk blog.
Well, Summer is wrapping up and our supplies of cat hair are running low. So we need you, Quirk fans, to once again brush your feline friends and send us your cat hair. We’re specifically looking for more white cat hair. See the sleepy kitten pictured above? Use him as a reference point. Or just look at him. Because he’s omgsocutesquee!
Ahem.
Note, that this batch of cat hair is for a TOP SECRET Crafting with Cat Hair project. The first three people to send us their cat hair will get a free advance copy of the craftbook, as well as a copy of The Meowmorphosis (for obvious reasons). Send your packets to…
Quirk Books
c/o Margaret & Katie
215 Church Street
Philadelphia, PA 19106
Questions? Email me at eric[at]quirkbooks.com. Thanks!
Posted by Eric Smith