How-To Tuesday: How to Make Gummie Han Solos in Carbonite
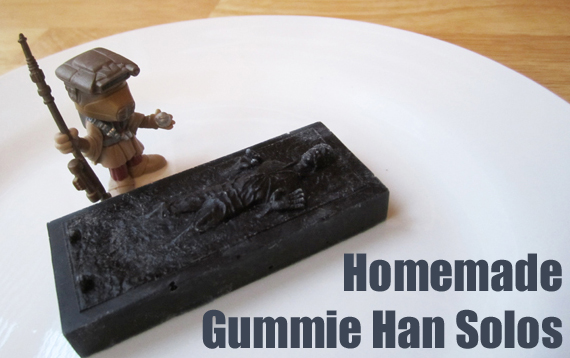
Make your own tasty rebels snacks with these simple instructions for DIY gummie candies! These treats are ideal for Star Wars parties, movie marathons, or just hanging out in Jabba’s palace. You could even use them to fill your Death Star piñata!
First, gather your materials:

- 1 package (3 oz.) flavored gelatin. I used Jello Berry Blue.
- 3 packages (3/4 oz.) unflavored gelatin
- 1/3 cup water
- Candy molds. I used these Han Solo in Carbonite silicone molds.
- Heat resistant mixing bowl with spout. If you don’t have a bowl with a spout, you can use a small ladle or a turkey baster to fill your molds.
- Flavored drink mix (optional). I wanted dark blue/black gummies, so added a packet of Kool-Aid Ghoul-Aid Scary Blackberry Unsweetened Drink Mix.
- Mold release (optional). I used a little cornstarch, but cooking spray works as well. Most food-grade silicone molds won’t need it.
Note: Making gummies is a time-sensitive task. It’s a good idea to prep as much of the project in advance as possible, and be ready to give the gummies your full attention for five to ten minutes while they cook and set up.

1. Prepare your candy molds for the project. If you choose to use mold release, add it now. I lightly dusted the molds with cornstarch and a clean brush, just in case. The yield for the recipe fills the Han Solo mold twice over, so if you have two molds on hand, prepare them both.

2. Mix your dry ingredients: the unflavored gelatin, flavored gelatin, and any optional dry flavoring.

3. Add your cool water and stir to combine. Once the ingredients are blended, let the mixture sit undisturbed for 2 minutes. This will allow the gelatin to bloom, and make the candy making process easier.

4. Pour the mixture into a saucepan over low heat. Continue stirring while mixture heats up and liquefies. Be careful, don’t let it boil!

5. Once the mixture has fully liquefied, move quickly and carefully. Pour the mixture into the bowl with a spout, and then into each of your molds. Pro-tip: If you’d like extra-clear gummies, allow your liquid mixture to cool on the stove, and then reheat it without stirring. Repeat this heating and cooling process and foam will appear on the top of the mixture. Skim off that foam, and you’ll be have a much clearer mixture.

6. Allow the filled molds to cool for a few minutes, then move them to a level section of the freezer to finish solidifying. Leave your filled molds in the freezer undisturbed for 20-30 minutes. Pro-tip: if your freezer has an uneven shelf, put your filled mold on a small baking sheet inside the freezer.

7. When solid, remove the gummies from their molds. Test gummies for their consistency by pressing your finger into the smooth surface of the candy. If it feels firm, remove it from the mold, but push it out, don’t pull. Pro-tip: gently pull the sides of the mold apart and push the gummie up and out of the mold from underneath.

8. Plate them up and enjoy! I dusted mine with a little powdered sugar to help the incredible details stand out. Then a bounty hunter holding a thermal detonator showed up and ate them all.