How to Tuesday: How to Make a Library Safe DIY Beaded Thread Bookmark
Do you have trouble misplacing bookmarks?
Ever yearn for old-fashioned hardcover books with a ribbon or thread bookmark built right into the spine?
With this DIY you can add your own luxurious handmade bookmark to any hardcover book – even library books – without fearing the wrath of an angry librarian!

Here’s how it’s done:
Gather materials:
· Thin yarn or ribbon – about 3 yards or more (roughly 8 times the length of your average book)
· 3 large beads – beads should be just the right size to fit a double thickness of your ribbon or yarn
· Scissors
· Large-eye needle
· (optional) Glue

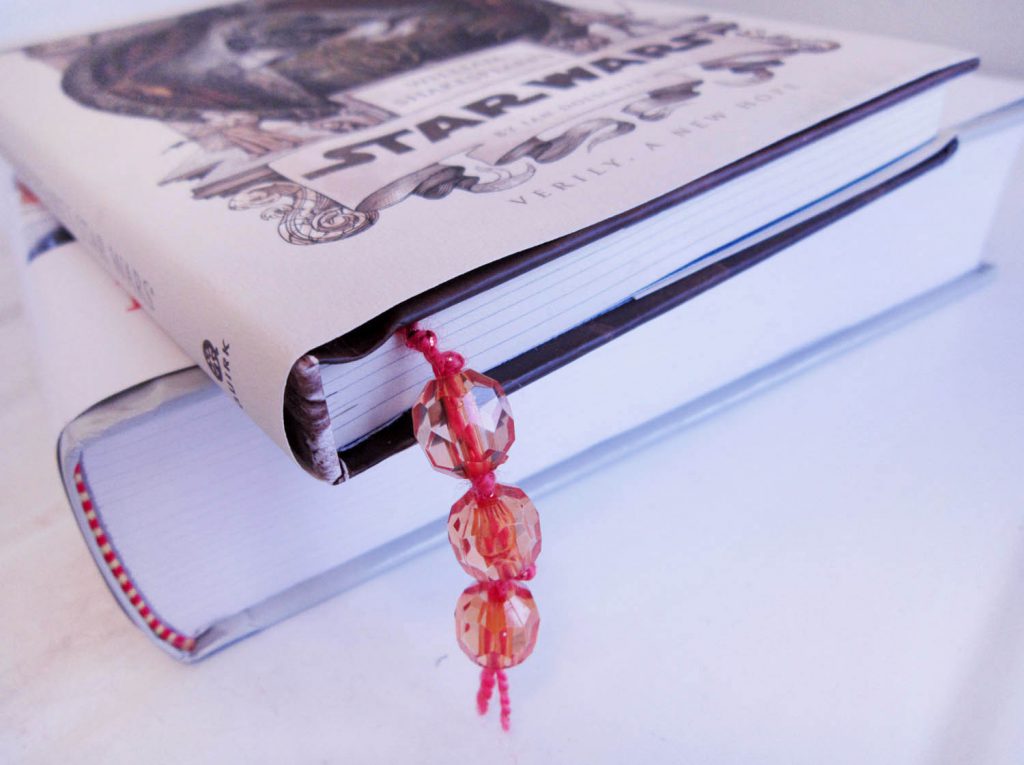
1. Thread your needle with your yarn. Next, thread all 3 beads with the yarn once, pulling through so that they are near end of your yarn (be careful not to let them slide off!).

2. Use the needle to re-thread the beads a second time, and then remove the needle. At this point you will have a piece of yarn folded in half with 3 beads holding the two ends together (don’t worry if your bookmark seems a little long, you’ll trim it to fit your ideal book size later on).

3. Knot the ends together tightly as shown. Your knot should be thick enough to keep the beads from sliding off – if it isn’t thick enough, try carefully knotting it again.

4. Just as you tied a knot at the ends of the yarn, tie another knot just below the center fold of the yarn, making a small loop just a little bigger than your beads. Knot securely.

5. Install your bookmark in a book in order to test its length:

Hold the looped and knotted end at the top of the spine along the back cover, letting the bookmark hang down.

Pull bookmark up inside the back cover, running along the spine. Push the beads through the loop and continue to pull your yarn through the loop. This is how the bookmark will stay secure.

Drape yarn and beads down over the first page of your book so that the bookmark runs from top to bottom, with the beads at the end dangling just beyond the bottom of the page.

6. Once you’ve installed the bookmark, you can trim the yarn and knot it at the right length for you. Make sure the yarn is a little longer than you want the finished bookmark to be; there are still some knots to tie and that will shorten the length a bit.

7. Tie knots between each of your 3 beads to secure them in place. Pro-tip: make the knot loosely and then position it in place. Slowly pull it tighter as you adjust the yarn and beads.
Optional: Dab clear glue or other sealant on the knots. This will help keep them (and the beads) in place. You may choose to trim the ends of the ribbon back closer to the knot – if you do this, make very certain to seal the knot.
There you have it – your very own handmade reusable bookmark – just remember to remove it before you return those library books!
Want to make more? Try customizing your look with different ribbons, yarns, beads or even tassels. Enjoy!