How to Knit an Ugly Christmas Sweater For Your Books
The ugly sweater: in our time there is no fonder tradition of the holiday season than donning some yarn-crafted atrocity meant to be fun and festive. And the book lovers of the world are not to be left out! This year, knit an ugly sweater for your favorite novel/ereader, your travel reading as you visit relatives, or as the best possible wrapping for a book you plan to give as a gift. Use this Quirk Books exclusive pattern to make your own!
Abbreviations:
- K – knit
- P – purl
- Kfb- knit into front and back of a single stitch
- K2tog – knit 2 together
- Ribbing – alternating between knits and purls. 2×2 ribbing means K2 P2, 1×1 ribbing means K1 P1.
Skills you’ll need:
Basic knitting, knitting in the round, Fair Isle/stranded knitting or embroidery/duplicate stitch
An appreciation for truly heinous holiday sweaters

Gather your materials:
Tools:
- 4 Stitch Markers (The ones pictured are from this Etsy shop)
- 2 Stitch Savers and/or scrap yarn
- Darning Needle
- Set of 5 Double-Pointed Needles (DPNs) in correct size for desired gauge or 24 inch Circular Needle for knitting in the magic loop style.
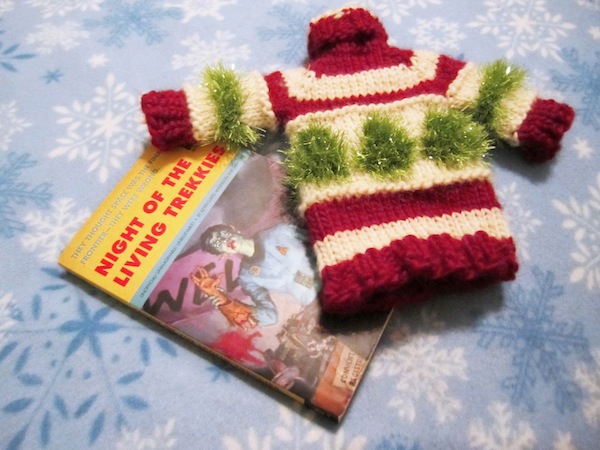
- Book to knit for: Have this book on hand for sizing. I chose one of my favorites, Night of the living Trekkies.
Yarn:
- Lion Brand Alpine Wool Yarn: Chili (1 ball)
- Lion Brand Alpine Wool Yarn: Vanilla (1 ball)
- Lion Brand Martha Stewart Crafts Glitter Eyelash Yarn: Peridot (1 ball)
- Lion Brand Glitterspun: Antique Gold (1 card)
Gauge: Gauge isn’t important for this project, but I recommend knitting a swatch with your chosen yarn and needles to help you decide on the best combination.
Note: The width of this sweater will vary depending on the book you make it for. To use the attached Christmas tree chart around the body, adjust the number of stitches between each iteration of the chart to fit evenly around the sweater.
Instructions

Neck:
Cast on 20 stitches loosely or using a stretchy cast on method like this one. Make sure to place a stitch marketr at the beginning of your round.
Join to work in the round, being careful not to twist stitches.
Work one round in 2×2 ribbing: K2, P2. Work one or two more rounds in ribbing for a crew neck sweater, five to seven rounds for a mock turtle neck, and twelve to fifteen rounds for a folded-over traditional turtle neck. For this turtleneck, knit 5 rounds in red, 5 rounds in white, and another 5 rounds in red.
Shoulders:
Knit around, placing stitch markers as you work between the 8th and 9th, 10th and 11th, 18th and 19th, and after the 20th stitch. This last one will be your beginning of round marker, so it’s handy to make it a different color.
Round 1: Knit
Round 2: This round, you will knit into the front and back of each stitch on either side of your stitch markers. Step-by-step: knit into the front and back of the first stitch, knit to last stitch before the next marker, Kfb last stitch before marker. Slip marker, Kfb, knit to last stitch before marker, Kfb, slip marker. Kfb first stitch, knit to one stitch before the next marker, Kfb last stitch before marker. Slip marker, Kfb, knit to last stitch before marker, Kfb, slip marker.
Repeat rounds 1 and 2 until the shoulders of your sweater are the width of the top of your book (your books “shoulders”). This sweater was worked with 5 rounds in red, 5 rounds in white, and another 5 rounds in red to reach the correct shoulder width. End on round 2.
Divide for your sleeves:
Once your sweater’s shoulders are broad enough, you’re ready to divide for the back, front, and sleeves of your ugly book sweater.
Knit all stitches up to the first marker. Using a stitch saver or a darning needle and scrap yarn, move all stitches up to the next marker off the needle. Secure the stitches temporarily – you’ll knit these later to form a sleeve.
Repeat this process to form the back of your sweater and second sleeve. Remove all stitch markers as you go except for the one marking the beginning of each round.
Work the body:
The stitches you have left on your needles after dividing for the sleeves will become the body of your sweater.
Now you can customize with stripes, buttons or embroidery – you can choose to do whatever pattern you like, the uglier the better! Since no one will be wearing this sweater, you can feel free to experiment with wacky novelty yarns and colors you would never wear.
For this sweater: K1 round in white, P1 round in white, K 5 rounds in white before working the Christmas tree chart around the body with a single strand of gold for the stars and 2 strands of the green lash yarn held together for the trees. K5 rounds in white, P1 round in white, K1 round in white. K5 rounds in red, K5 rounds in white, and then K1 round in red before you K5 rounds in 2×2 ribbing in red and bind off.
Whatever design you choose, work your ugly sweater till you reach the full length of your book, then work k2p2 ribbing along the bottom for 4 to 6 rounds, or whatever looks right to you. Ribbing is stretchy, and this section will help hold the book inside the sweater. Bind off loosely or using a stretchy bind off method like this one, and then turn your attention to the sleeves. If your customized sweater doesn’t divide evenly into 2×2 ribbing, decrease evenly around until it does.
Complete the sleeves:
Transfer sleeve stitches from your scrap yarn (or stitch saver, or enterprising paperclip construction, etc.) onto DPNs evenly. Join yarn and leave a long tail in case there are any saggy stitches to sew up in the armpit when you’re finished. Add a stitch marker to mark the beginning of each round.
For this sweater: K1 round in white, P1 round in white. K5 rounds in white, K3 rounds with 2 strands of the green lash yarn held together. K5 rounds in white, P1 round in white, then K1 round in white. K3 rounds in red, followed by 5 rounds in 1×1 ribbing in red and bind off.
Knit your sleeve until it is the width of your book’s shoulders, finish last inch in 1×1 ribbing. Bind off loosely or using a stretchy bind off method like this one. If your customized sweater’s sleeve doesn’t divide evenly into 1×1 ribbing, decrease evenly around until it does.
Repeat for the second sleeve.
Finishing:
Take a look at your sweater: could it be gaudier? Does it need more baubles? Now is the time to add embroidery, extra buttons, or even pompoms. If you are using the Christmas tree chart, you can embroider on stumps for your trees or garland in a nice contrasting color.
Weave in the last few ends, and check your sweater’s armpits for any gaps – if you find any, sew them up with your yarn tail.
Congratulations, you’ve just made the best, ugliest book sweater ever!
Snap a photo and share it on our Facebook – we’d love to see your creation!

Use this chart to work Christmas trees into the body of your sweater with Fair Isle/stranded knitting. You can also embroider or duplicate stitch your Christmas trees onto the sweater after you are finished knitting!