Our Blog
How-To Tuesday: DIY A-to-Z Bookends
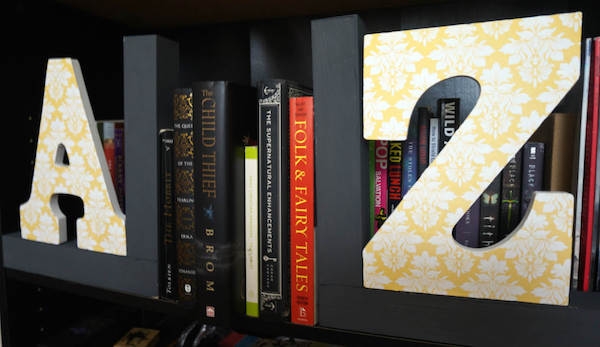
As a lover of books, you need your reading nook to look as beautiful as the stories you love. These totally customizable bookends will help you do just that! You can construct these to reflect your initials or make them for a soon-to-be wedded couple or a newly arrived future reader. Whether you decide to give these to a loved one or treat yourself to them, this is a gift that's sure to satisfy anyone!
Posted by Lauren Gordon
How-To Tuesday: DIY Quotable Frames
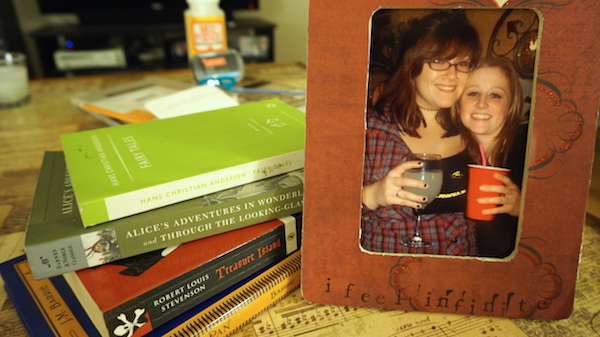
Whether it happened in your freshman year of high school or last week while you were waiting in the dentist’s office, when it happens, you just know. That moment you realize that after spending all of this time to time together, that this is the one. The one you’ll carry throughout your life, that will stand by you and help you define every major moment to come. This is the quote that will define who you are.
When you find that perfect quote while reading your newest favorite book, something magical happens, and if you’re lucky, it happens over and over again. So for the many quotes that have inspired you throughout the years, give them a place of honor: place them on the pretty frame that holds a photo of the one you love. Follow this simple tutorial, and you can make these fabulous, quotable frames.
Posted by Lauren Gordon
How-To Tuesday: How to Make a Dr. Seuss-inspired Truffula Tree Pom Pom Rug
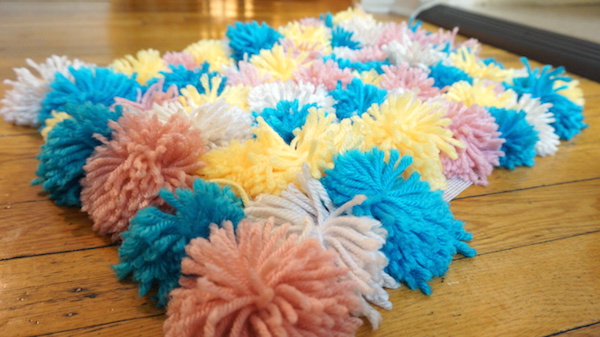
For parents-to-be who happen to be literary nerds, take a page from Dr. Seuss' books to decorate your new little one’s room with an adorable and sweet nursery theme. You can pull inspirational quotes from the books of Seuss, play up bright colors that will keep your little "Who" entranced, and of course load up the library with all of the Seuss classics. To tie it all together, you can make a Truffula Tree Pompom rug as a subtle and stylish nod to Seuss' The Lorax. This project requires very little in the way of materials and is simple enough to make that any level crafter can do it. Not only will it be a stylish room accent, it can be the perfect backdrop to the endless newborn photo shoots.
Remember, a handmade project adds a personal touch, no matter how small!
Posted by Lauren Gordon
March Big Deal: Crafting With Cat Hair $3.99 on Amazon the Rest of the Month
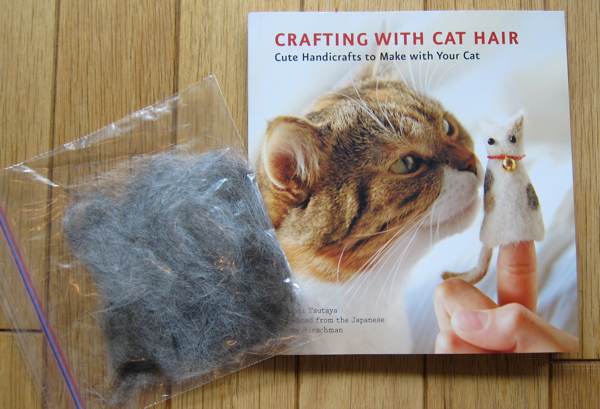
Photo via Boing Boing
This month, you've got an opportunity to snag a lot of Quirk titles on the cheap, thanks to Quirk Perks (The Little Guide to Vintage Shopping and Secret Lives of the Civil War are both only $3.99) and starting today, this month's March Big Deal over on Amazon.
From now until the end of the month, you can pick up Crafting With Cat Hair for only $3.99 on your eReader!
Posted by Eric Smith
How-To Tuesday: How to Make a Hardback Charging Station

Welcome to the first How-To Tuesday of March! This week I’ll be showing you how to make a hardback book charging station for your lifeline, I mean, cell phone.
If you’re like me, the only time your phone is out of your sight is when you’re sleeping — and that’s only because you’re eyes are literally closed. That bad boy is with you through work, play, and relaxation time alike. But I must admit, that plain ol’ charging cord can cut into the chic atmosphere you’ve spent many an hour perfecting in your bedroom or office space.
This DIY is actually quite easy, and can be completed in about 30 minutes start to finish. So pick out a hardback (obviously one that can be cut into) from your extensive collection and let’s get started!

What You’ll Need
Hardback book
Phone Charger
Drill
X-Acto Knife/Box Cutter
Measuring tape
Glue (optional)

Step 1: Measure Your Charger Head
Use the measuring tape to measure how wide your charger head is. You’ll want a snug fit, so do as exact a measurement as you can.

Step 2: Decide Where You Want the Phone to Sit
Choose where you’ll want your phone to stand up from, using the measuring tape as a reference of how big the charger head is. I chose the approximate middle of the book for mine.

Step 3: Drill Two Holes
Use the drill to drill two hole — one for each end of the charger head. Since the iPhone 5’s charger is so small, my hole’s ran together a bit, and that’s perfectly OK.

Step 4: Make Sure You’ve Drilled Through
Press hard to make sure you drill through the cover and onto the first couple of pages.

Step 5: Cut Between the Drill Holes
Using the X-acto knife or box cutter, cut between your two drill holes or help hollow out the space if the holes are already connecting.

Step 6: Check If the Charger Head Fits
Insert the charger head into the hole to make sure it’s a good fit. Use the knife to free up some space if it’s still too tight and if you accidently cut too much, use a drop of glue on each side to make it snug again.

Step 7: Cut the “River”
Using the hole in the pages as a starting point, start to cut a “river” for your charging cord to rest in. It doesn’t have to be big, just wide enough for the cord to comfortably lie there.


Step 8: Keep Cutting Until It’s Deep Enough
You’ll need to keep cutting into and removing strips of pages until your cord head will just barely peak out of the front cover.

Step 9: Close Cover and Set Up
After the river is deep enough, insert the cord and close the cover so that the head stands up through the front cover.

Step 10: Show Off!
That’s it! You did it! Now set up your book wherever you usually charge your phone and style it to your hearts desire. Also, prepare yourself for all the compliments you’re about to get on your expert DIY work.
Posted by Emily Kelley
How-To Tuesday: How to Make Medieval Ink
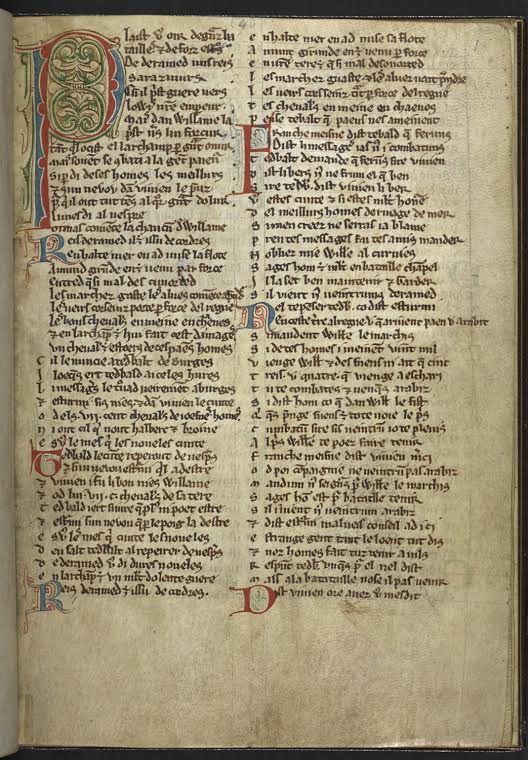
In this week’s How-To Tuesday we are going medieval. We are making our own black ink using a recipe from thirteenth-century France.
Looking at the golden inlays and the red and blue ink of a medieval manuscript, it is easy to understand why these books were so expensive to make. But most of the text was written using black ink, which at first glance doesn’t seem to be very expensive. However, the black ink was exclusive as well. It took time to make and the ingredients had to be imported from far away.
The black ink that was used in medieval Europe is called iron-gall ink. There are hundreds of recipes for making iron-gall ink, but they have a few things in common. These things are gallnuts, iron vitriol (a. k. a. copperas), and gum arabic. Many recipes also use rainwater and wine.
Posted by E.H. Kern