R2Tea2: Crochet Your Own Tea Cozy!
Feel like there’s a restraining bolt on your productivity? Need a hot cup of refreshment to reboot?
It’s important to keep some comforts close at hand while you fight the Empire, and what goes better with a rousing game of holo-chess than a fresh pot of tea? Keep your tea warm till you’re ready to drink up with this nifty tea cozy modeled on everyone’s favorite* astromech droid: R2-D2.

First, gather your materials:
• Yarn: you’ll want a thick, white, wooly yarn to crochet this project
• Crochet hook: appropriate size for gauge and comfort
• Felt: black, white, dark blue, light blue
• Fabric paint: white/silver, for detail work
• Fabric glue
• Needle and thread
• Sharp scissors
Crochet skills needed:
• Chain stitch
• Double crochet
• Double crochet 2 together
• Crochet in the round
• Crochet flat (standard)
• Slip stitch

Measure your teapot. Measure your teapot all the way around at its widest point, not including the handle. This will give you the circumference of the tea pot and the estimated size of the cozy. Your tea cozy will need to pull down over the teapot and fit snugly, but not too tight.

Swatch in double crochet for sizing. This pattern is designed for any size teapot and yarn, so you’ll need to make a swatch to make sure it will fit. Grab your yarn and work a gauge swatch to get your measurements (how many stitches do you need to get a square inch of fabric?). Now compare how many stitches per inch you got in your swatch to the height and width of your teapot. For example, if you have 4 stitches per inch in length, and your teapot is 10 inches around, you’ll need about 40 stitches.
Crochet your cozy!
1) Chain the number of stitches need based on your swatch, and join in round.

2) Chain 2, and work a round of double crochet into each chain stitch. Join in the round using a slip stitch, being careful not to twist. The next portion you will work flat (rather than in the round) to form the two sides of the tea cozy – later you will join them to form the openings for the handle and the spout.
3) Chain 2 and work a double crochet into each stitch for HALF a round, and then stop. Work the next row into the stitches you just made.
4) Chain 2 and turn. Work a row of double crochet into each stitch across the row you made in step 3. Repeat until the side panel of your tea cozy is as tall as the point where the handle meets the body of your teapot. Break yarn. That’s fancy yarncrafter talk for “cut the yarn here leaving a few inches hanging off.”

5) Starting in the stitch just after your last double crochet in step 3 (the first open stitch in that original round of double crochet), join yarn and chain 2. Work a row of double crochet across, equal to the size of the panel you just made. Do not join. Repeat step 4 until both sides are even.

6) Join the corners of the panels with a slip stitch. Chain 2 and work a double crochet into each stitch around. Join with a slip stitch, chain 2. Pro-tip: using this method, one side slit will be longer than the other. This is the slit you will place over the handle of your teapot.
7) Start decreases. Double crochet 2 together, then double crochet into the next stitch. Repeat around, then join with a slip stitch. Repeat this round until the circle opening at the top of the tea cozy is about 2 inches across.

8) Chain 2, work double crochet 2 together into each stitch. Join in round, break yarn, and knot securely. Weave in ends.


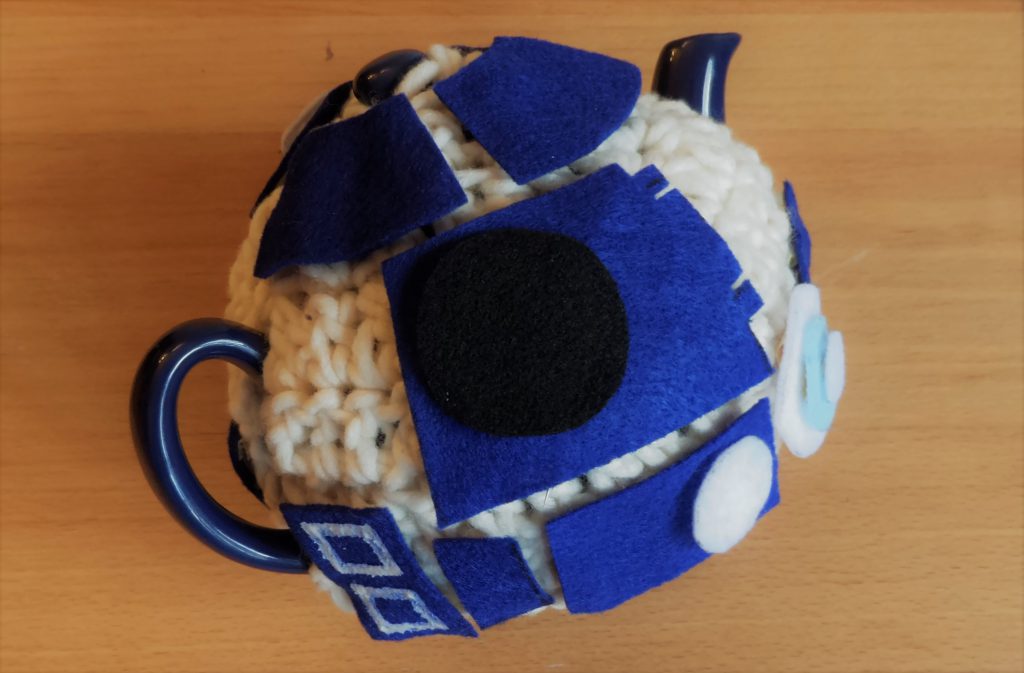
Cut your felt. Use the hand-drawn template below (or sketch your own template!) to trace and cut out your decorative astromech accouterments. Trace each template onto your felt, cut them out with sharp scissors, and lay them out in the order they will appear on your finished tea cozy. Now is the time to customize them with a little extra fabric paint or decoration!

Stitch/glue your felt to your tea cozy. Place each piece of felt onto your tea cozy to ensure they are spaced out evenly, and then get to stitching! If you choose to use glue instead of sewing, tape your felt in place while it dries to keep everything in place while the glue sets.

Pro-tip: put the cozy on your teapot while you stitch on your felt pieces, that way you can be sure they will line up beautifully on your finished project!
Put the kettle on, because you’re ready for tea! With a tea cozy to keep your beverage warm, there’s no chance of a bad motivator getting in the way of your secret mission to save the galaxy.