How-To Tuesday: DIY Bookish Curtain
It’s back-to-school season, and droves of students are heading to dorms around the world with books, school supplies, and living essentials to make their dorm rooms feel a little more like home. This month our How-to Tuesday posts will be all about how to use crafty projects to make over a dorm room – and all on a college student’s budget.
Privacy is a luxury worth protecting in your average dorm room; with scholastic and social demands filling up the calendar, taking time to curl up with a good book is essential. Give yourself an added layer of reading privacy with a simple DIY bed canopy you can design and hang yourself (without giving your RA a heart attack).

Materials
- Sheer Curtain Panel
- Fabric Paint
- Pencil/Marker
- Heavy Paper – a paper grocery bag cut open works well
- Scissors
- Tape
- Ruler (optional)
- Hanging Hardware (see below)

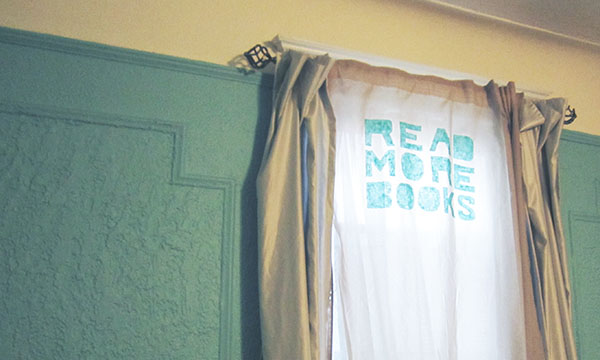
Choose a phrase to write on the canopy. For this example we chose “READ MORE BOOKS” because, frankly, we love books and always want to read more of them. Other good phrases include “Shh… I’m reading” “Just one more chapter!” or “Once upon a time…” Have fun with it and choose a phrase that is meaningful for you.

Write out your phrase on the heavy paper. As you write out your words, keep in mind that you will have to cut them out! Make your letters thick and leave plenty of space between them – the stencil needs to be a little sturdy. Pro-tip: Define how much space each letter will take up before you begin writing. You can do this by measuring with a ruler or folding the paper to divide it evenly.

Cut out your stencil carefully. Using a pair of sharp scissors, cut into each letter slowly. Pro-tip: Outline each letter in pencil first, and then again in permanent marker once you’ve finalized what you want it to look like. Defined lines in permanent marker are easier to see and easier to cut along!

Secure your stencil and start painting. Arrange your stencil in position near the top of your canopy and tape it in place securely. Begin painting with quick, short strokes from the edge of the stencil toward the center of each letter. As the edges of the letters dry, begin filling in the centers of the letters with similar quick, short strokes. When the paint is almost dry, remove the stencil and let hang to finish drying completely. Pro-tip: leave a sheet of heavy paper on the underside of the curtain panel while you paint – this will catch any paint that seeps through the thin fabric.


Hang your canopy using the best method for your dorm set up. Insert a yardstick or long strip of firm cardboard into the curtain rod pocket of your canopy. Have a single bed up against a wall? Use adhesive hooks and a little string to attach the ends of the yardstick to the wall, and let the canopy drape over the head of your bed. Sleep in a top bunk? Fix the adhesive hooks to the ceiling by the side of your bed, and let the canopy hang straight down beside the bed. Shorten it to only cover your portion of the bed, or let it be longer if your bottom bunkmate likes the look. Sleep in a bottom bunk? Easiest of all – tuck the yardstick under the mattress of the top bunk and let the canopy drape down.
A sheer curtain is an excellent way to make any space a little more private, particularly when you can’t change anything permanently. Once you’ve finished your canopy, get cozy and enjoy some leisure reading along with your textbooks this semester!