How-To Tuesday: Save the Day in a DIY Cape
Editor's Note: This post was originally published on 8/4/15.
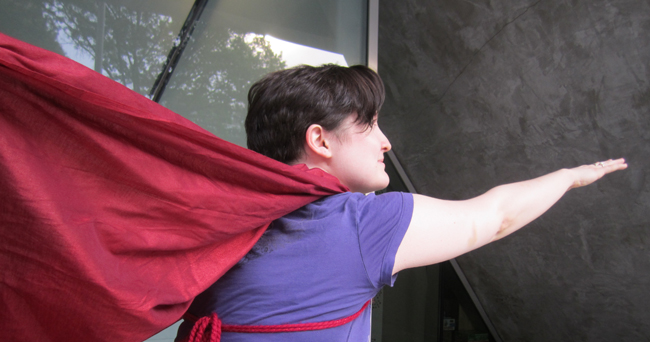
This Tuesday we're here to help you become the hero of your own story – compete with your own custom-made cape!
A nod to The Fangirl's Guide to the Galaxy, this red over-shoulder cape is perfect for the heroine who’s saving the day on her own terms. With a comfy tied closure, this cape sits well on all body types without catching around the neck. Get ready to don on a cape that even Edna Mode will approve of!
Materials

- Fabric – choose a fabric that looks good on both sides.
- Thick cord or ribbon – 2 yards for single-thickness ties, 4 yards for doubled ties
- Thread – in a color that matches fabric
- Large darning needle or safety pin – the threader for your cape’s ties
- Sewing needle
- Pins – (optional, but helpful for sewing the channel)
Directions
Cut cape shape
Experiment with triangles, trapezoids, and curves. For the most basic superhero cape a rectangle is ideal. (The example here is a rectangle.) Finish all edges by hemming before proceeding to the next step. Pro tip: Cut down on sewing time by selecting a fabric that doesn’t need hemming (like fleece or felt) or that comes hemmed already (like a small tablecloth or curtain panel).
Fold and stitch a channel for ties

Designate one of the narrower sides of your rectangle as the top of your cape. Fold one inch of the edge over onto the hemmed side. Stitch along the folded-over edge, creating an inch wide tube of fabric running along the top of your cape.
Thread ties through the channel.

Thread your ribbon or cord through your threader – a large darning needle or safety pin. Push the threader through the channel you’ve just sewn by inching it through a little at a time. If you plan to wear the ties doubled as in this example (and you have 4, rather than 2 yards available), make sure to thread your cord or ribbon halfway through, leaving the threader at the center of the strand. That way you will evenly carry two strands through at once.
Finish ties and move cape material to center.

If you are using doubled ribbon or cord for your ties, knot the ends to finish them and to prevent tangles. Pull and scrunch the cape fabric to the center of the ties. Now your cape is ready to wear!
Tie the cape on (safely!)
Many basic capes knot around the neck, but this is a very real choking hazard. So not-super. To tie this cape on safely, cross the ties above your sternum and wrap them around to your back. Knot the ends in place behind your back with a simple granny knot and bow (like tying your shoes). With this method, your cape will stay in place while you fight for justice and come off easily when you want it to.
And there you have it, a cape that’s safe for you to wear while you protect the innocent people of Gotham/Metropolis/Coast City/New York/Peoria.

Side benefit? This is the same way Jon Snow’s cape closes. Nice.