DIY Epic Fantasy Belt Pouch!
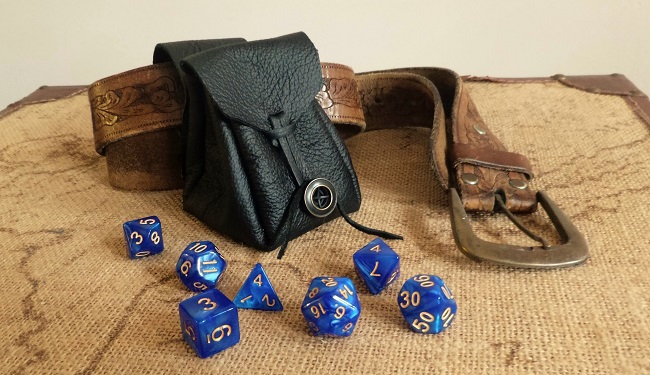
Magic beans. Crystal shards. Enchanted acorns. Dice.
When one travels through the woods on an epic quest, one has the occasion to carry all manner of tiny trinkets and magical items. To stow them you’ll need something secure but close at hand. A handmade belt pouch is the perfect accessory to keep your items safe (and secret, as the case may be). This pouch has a rough-hewn handmade look to it, so each one you make will be a little bit different. Here’s how to make your own.

First, gather your materials:
– Scrap Leather – You could also use a vinyl, synthetic leather, or other non-fraying fabric. You’ll want roughly a square foot for a fist-sized pouch like this one. – Leather Sewing Needle – A hand-sewing glover’s needle or a leather-friendly sewing machine needle will make sewing through your leather a breeze. – Thread – Choose a thread that matches the color of your leather. – Button – The more magical-looking, the better! – Sharp Scissors – Single Fanciful Button – Scrap Paper – Permanent Marker – Pencil – Ruler/Measuring Tape

Choosing a magical-looking button can be tough! We recommend consulting an oracle or casting a divination spell.

First, cut out your tracing template. Cut a strip of paper 3” to 4” wide (wider is better if you have larger hands/want a larger pouch) and at least a foot or so long, and get ready to lay it across the fuzzy side (also called wrong side) of your leather. If you are working with an irregular shape like the one we used, lay your template across the leather scrap at its widest point. Pick up your template and lay it across your fabric perpendicular to your traced lines to create an X shape – leaving one ‘leg’ of the X longer than the others (it will look a bit like a lowercase ‘t’). This will be the flap closure at the top of your pouch.

Cut out your traced shape. Once you’ve traced out your X shape, cut it out!

Pro-Tip: If you want your pouch to taper at the top/be wider at the base, take this opportunity to trim the legs of the X down a little. Trace a diagonal line from about ½” from the edge at the end of each leg to the corner where the leg meets the center of the X. Once your pouch is sewn up, this diagonal edge will give the pouch a slight teardrop shape.

Cut a strip of leather for your belt loop and attach. Cut out a strip of leather measuring roughly 6×1½” – this strip will be the loop that goes around your belt. It’s important to sew this loop on BEFORE you sew up the sides of the pouch! Fold the strip in half and stitch it to the right-side of the longest leg of your X, just above where that leg meets the middle of the X.
Pro-Tip: Make your life even easier by stitching on one end of the loop, folding the strip over, and then stitching the other end directly onto the leg of your soon-to-be pouch. This way you only stitch through 2 layers of leather at a time – stitching through 3 layers at a time can be challenging, even if you use a sewing machine.

Stitch sides together. With the wrong-side (remember, that’s the suede-y, fuzzy side of the leather) facing out, hold the edges of two legs together. Stitch the sides together leaving ¼” of seam allowance (space between your stitches and the edge). Complete this process for all 4 seams and turn your pouch right-side out. Leave the longest leg untrimmed to form the flap, but go ahead and trim the other edges around the mouth of the pouch to make them smooth and uniform.

Pro-tip: Once the mouth of the pouch meets with your approval, use a needle and thread to put a few extra stitches through the very edge of each seam. This will reinforce the sewing you’ve already done and boost the structural integrity of your finished belt pouch.
Stitch on your button. Using doubled-thread for extra strength, stitch the button of your choice to the front of your pouch. This button will keep all your magical wares secure in the pouch, so make sure the stitches that hold it on are sturdy.

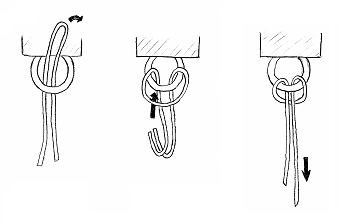
Cut thin strip of leather and attach it to the flap. Cut a thin strip of leather 6” to 8” long and between ⅛” and ¼” thick. Then cut a small horizontal slit half an inch from the edge of your pouch’s flap. Push both ends through to form a cow hitch knot (don’t worry, it’s easy). This knot will leave both ends of the thin strip dangling over the button you just sewed on.

Secure the pouch to your belt and you’re done! Wrap the thin strips around the button a few times to fasten your pouch and keep those magical mementos safe. If the belt loop is a little too big for your style once you try it on, whip stitch the sides of the loop together starting at the point where you stitched them to the pouch.

If you’ve made your own DIY belt pouch, we’d love to see it! Tag us on Instagram or tweet your pics at us to share your crafting adventures!

