How to Splice Your Own Dinosaur Refrigerator Magnets
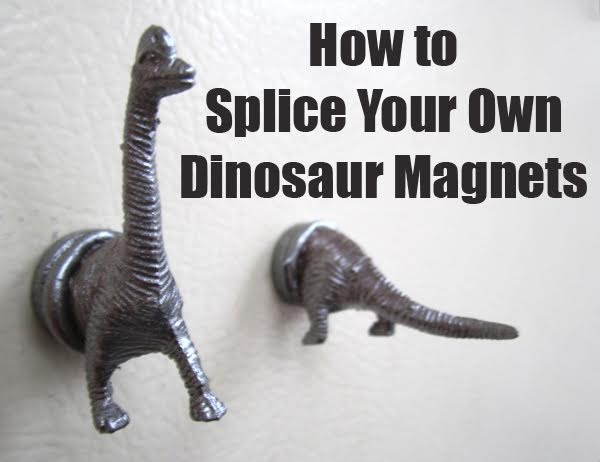
The truth is, we never really grow out of our childhood love affair with dinosaurs. Make these terrible lizards part of your home or office with these easy to DIY dinosaur magnets. No need for the lysine contingency here – these dinos definitely won’t reproduce in the wild. And by using sturdy magnets, there’s no risk of escape! No risk at all…
Materials

- Plastic dinosaurs: A multi-pack from the dollar store or party supply store is ideal. If you can find them, the slightly rubbery kind are best for this project.
- Small magnets: Half-inch craft magnets are strong enough to hold onto your fridge, memos, and half of a tiny dinosaur. The magnets from the edge of your old shower curtain work well too.
- Craft knife: A small craft knife or saw will cut through your plastic dinosaurs. If you have access to a heat knife, that tool will slice through plastic easily by melting it.
- Hot glue and glue gun: Hot glue provides a secure connection and gives you a thick, sturdy mounting for your dinosaur.
- Paint: To paint your dinosaur magnet, use an acrylic paint and a brush or a can of spray paint designed for plastics.
Instructions
1. Choose your dinosaur. Select a dinosaur. You’ll want one that you can split width-wise and that looks good in profile. Choose your dinosaur samples carefully – training your own team of velociraptors is a challenging task!


2. Cut your dinosaur in half width-wise. Carefully hold your dinosaur in place and begin to make your incision. Rigid plastic dinosaurs take more time to slice through than the pliable, rubbery ones. If you have access to a small craft saw or a heated blade, those tools are best for the tough-to-cut toys.


3. Glue each dinosaur half to magnets. Apply a pea-sized drop of hot glue to the center of your magnet, and immediately embed the sliced edge of your dinosaur in the glue. Let the glue cool fully before cleaning off any spider web threads of glue or stray droplets. Complete one magnet at a time – the glue cools quickly and you’ll want to get your dinosaurs in place as soon as possible.

4. Paint your dinosaurs. Once the magnets have cooled fully (5 to 10 minutes) you’ll be ready to paint! To paint with an acrylic and a brush, work as usual over a clear, protected surface. If you plan to spray paint your magnets (as I chose to in this example) you’ll need a well-ventilated area to paint and allow your projects to dry. By placing them in a large box, I was able to hit all angles of the dinosaurs without touching them or moving them.


5. Display and enjoy! Dinosaur magnets make a fun and quirky addition to any refrigerator, memo board or locker. Add yours to your everyday décor to make your own world just a little more Jurassic.