How-To Tuesday: Zombie-Proof Leather Book Cover
Pride & Prejudice & Zombies is in theaters around the world, bringing together Austen-lovers and zombie survivalists in a whole new cinematic way. If you’re preparing for the zombie apocalypse, keep in mind that for anyone to be called truly accomplished, they must always be engaged in the improvement of their mind by extensive reading. Keep the books in your arsenal/library safe and sound by covering those precious paperbacks in leather! Here’s how.
First, gather your materials:

- Leather – scrap/synthetic leather is fine
- Strong glue – a thick, firm glue is best
- Sharp scissors
- Book of choice – Pride & Prejudice & Zombies suggested but optional ;)!
- Fine-tipped marker
Make sure you have enough leather
Leather has a few advantages in crafting – it’s durable, pretty, and never needs to be hemmed! Make sure your leather piece is at least as wide as your book is tall, and as long as five or six times the width of your book. For most books, a uniform piece about 12 by 36 inches will be fine, but check before you get started that your leather will fit!
Pro-tip – Scrap or damaged leather can give your project a unique look. In this example, the leather was actually scrap leftover after shortening a leather skirt!
Glue the front cover to the edge of your leather
Starting with the edge of your book and the cleanest edge of your leather, apply glue to both the leather and the book cover. Let the glue get tacky for a moment (follow the instructions on your glue of choice) and then place the edges together. Check that the edges line up well and press firmly. Let this bond dry for a few minutes, then apply glue to the rest of the front cover and press the leather in place.

Pro-tip – Run a thin, steady bead of glue all the way around the edges of the cover. You want to make sure the leather adheres to the edge. If you are nervous about gluing pages together, put a piece of scrap paper between the cover and the first page of the book to catch any drips.
Repeat process around the spine and back cover
Continuing to the spine, apply glue to the edges and press the leather to the cover firmly. While the glue is still wet, pull it gently into place so that it lies flat and smooth against the cover. Once the spine has dried for a few minutes, complete the gluing process on the back cover as you did on the front.

Trim excess leather
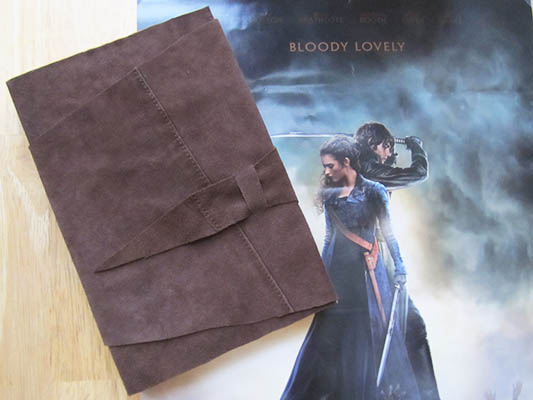
Once the glue has dried completely, trim back any excess leather. Snip the leather at all corners of the book and cut closely and carefully. When finished, your book should be completely covered in leather with even edges trimmed back on all sides with a length of leather connected to the back cover.

Cut remaining leather into a long triangle
Trim the leather that extends from the back cover of your book into a long triangle. Depending on how long your leather is, you can make this a simple long triangle that wraps your book once all the way around (as we did for this example) or your leather can wrap around your book many times. It’s entirely up to you!

Pro-tip – Don’t worry if your cut is a little irregular here or there. Irregularities can actually add a unique flare to your finished project!
Create slot for securing strap
Once your leather triangle is cut, go ahead and wrap it around your book, tugging it firmly into place so it lies flat and flush with the cover. Note where the last few inches of your triangle lie on your wrapped book – these last few inches will become your securing strap. Mark where this strap lies and how long and thick a slot you will have to cut to secure it.


Pro-tip – Most slots need to be at least a half inch thick and an inch long. You can try reinforcing your slot after completing your project by laying it out flat and applying some glue to the wrong side of your leather wrap. Let it dry completely before testing it out again though, you don’t want to accidentally glue your book shut!
Test fit and trim
Wrap up your newly-protected book, snip the slot, and test how well the securing strap fits. It’s always best to snip that slot too small at first – you can always make the slot longer or make the strap narrower!

Defeat your foes, save the day, and keep reading!
Carry your protected book anywhere you like – it’ll fit nicely into a saddlebag on your journey to London, stay secure in the crook of your arm on the walk to Meryton, and would be right at home on an ornate end table at Rosings Park!

Fancy a turn about the room with your own copy? Get the book here, and check out the movie in a theater near you!