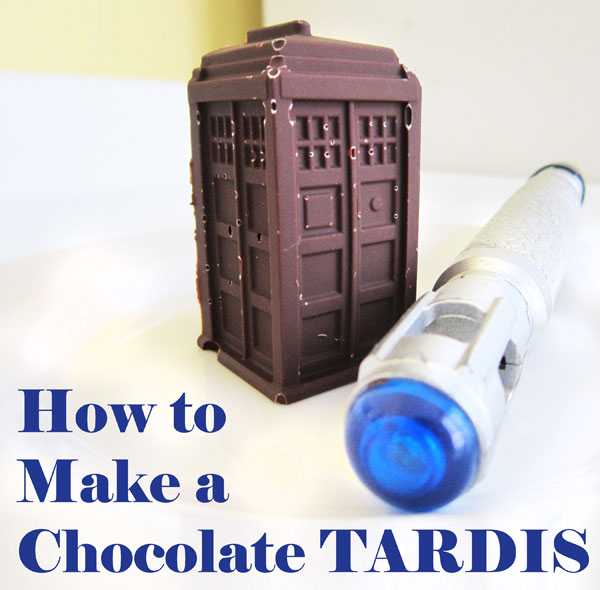
How-to Tuesday: Make Your Own Chocolate TARDIS in Five Simple Steps
Chocolate, geekery, and Do-It-Yourself-ing: 3 things we love, so why not celebrate them all? Follow these 5 simple steps to make delicious melt-in-your-mouth chocolates inspired by your favorite geeky interests. You can even add special goodies to your chocolates with our bonus tips on additional ingredients!
Gather your materials:
· Double Boiler – the easiest way to melt chocolate effectively is with a double boiler, but if you don't have one you can heat water in a shallow pan and use a smaller pan or heat-friendly bowl to hold your melting chocolate.
· Water – enough to fill your double boiler, or the larger of your two pans.
· Chocolate – grocery store baking chips are fine, pure chocolate bars work well too. Start with a bag or two of semisweet or milk chocolate.
· Molds – a silicone mold is perfect for chocolate-making because it can stand heat and can make sharp details pop. The molds in this tutorial are available online here: Carbonite Han Solo, TARDIS.
· Silicone Spatula
· Small Table Spoon
· Special Extras – once you've got the basics of the chocolate-making process down pat, you can try adding special elements to your candies. For this project, I used Andes Crème de Menthe candies.

1. Heat the water, prep your chocolate Heat the water in your pot/boiler on your stovetop. While the water comes up to a near-boil (some bubbles on the bottom, but a fairly undisturbed surface) pour your solid chocolate into the melting pan. Pro tip: the volume of chocolate will get smaller as it melts down, but it's easy to add more once the melting has begun.

2. Melt your chocolate Once the water is at a near-boil, you're ready to melt! Gently lower the melting pan into the water. Watch your chocolate carefully and don’t rest the melting pan on the bottom of the water pan. Wait till the chips begin to glisten before gently stirring (more like spreading frosting than actual stirring) with your silicone spatula. Once the chocolate looks smooth and reaches the consistency of warm creamy peanut butter, it is ready to pour.
Pro tip on melting: Don’t put your chocolate on direct heat – it’s very easy to burn it! Using the double boiler method heats the chocolate evenly and keeps the heat at a constant temperature. The science works like this: water boils at 100°C or 212° F and can't get any hotter than that without evaporating. That makes hot water a perfect way to regulate heat! Just make sure the surface of the water is calm, you don't want it to splash into the chocolate.

3. Prep the mold and pour Silicone molds are flexible, so rest yours on a baking sheet or cooling rack for stability. When your chocolate is melted fully, remove the pan from the hot water and gently spoon/pour chocolate into the molds. Be careful not to let any water drip on the molds! Pro tip: use your spoon or a toothpick to ensure that the chocolate has made it into every detail of the mold and remove any bubbles.

4. Let your chocolates cool Let your mold cool in a clear, undisturbed part of the refrigerator. Let it cool for at least 2 hours for a shallow mold like the tiny Carbonite Solos and longer if your mold is deep like the TARDIS. These chocolates were allowed to cool and solidify overnight.

5. Enjoy your chocolates! You can wrap your chocolates as tiny gifts, decorate cakes with them, or lay them out with your spread for a series premiere party, nerdy book club, or sci-fi crafting circle. Just remember that like all chocolate, the more you handle it or leave it in warm places the more it will melt.
—
Have you tried making candy with a silicone mold before? Leave a comment to tell us all about it!